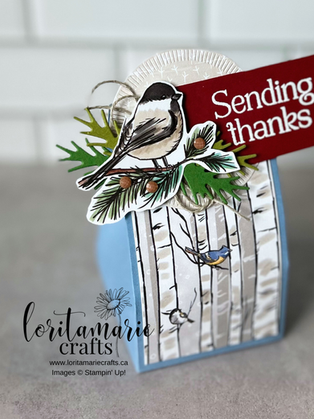
This week I thought it would be fun to share a couple simple little DIY gift bags that you could make. They would be perfect for any occasion really, but with Christmas just around the corner, they would be great for friends, teacher gifts or for your neighbours or co-workers . . . really anyone!
I chose to use the Nests of Winter Suite Collection as it is perfect for changing to whatever occasion you want to focus on. The colours and sentiments I chose are good for any winter occasion. If you wanted to make them Christmassy, all you would have to do is add a bit more red & green and change up the sentiments!
The YouTube replay is below to see exactly the measurements and how to make these projects.

Bag 1
I love projects where you can use your Designer Series Paper! This bag takes a 1/2 sheet of paper and I think it looks great with this birch wood pattern. The bag is 4 1/4" x 1 1/2" x 4" so you could fit a lovely little gift or treat inside.
Next, you can have fun creating any kind of tag that you would like. Of course, I love the Nests of Winter DSP because there are so many darling birds to choose from that you can just cut out of the paper! I didn't want this to look too Christmassy, so just by colouring the berries a lighter colour, you get a whole different feel.
Bag 2
This one is a little bit smaller. It measures 2 1/4" x 2 1/4" x 2 1/2". I used Boho Blue as the base for the bag and it creates a bit softer of a look. If you changed it out to Green or Red, then you've instantly got a more holiday feel.
Don't you just love this pattern of the DSP with the birch trees and the little birds?! It's definitely my favourite!
Key Products Used
I really love the versatility of the Nests of Winter Suite Collection. If you were lucky enough to get the coordinating Paper Pumpkin Kit, then you also have some matching holiday sentiments you could pair with it. These are my highlighted products that I used today and you can always see Stampin' Up!'s full line of products online or contact me for more details.
Nests of Winter DSP (Item 164183)
Winterly Tree Tops Bundle (Item 164066)
Earth Tones Shimmer Gems (Item 164070)
Watch the Tutorial
For a detailed, step-by-step guide, you can watch the replay of the video below. I’ll walk you through the entire process of creating these projects. Craft along with me to see how easy it is to bring these designs to life.
If you would like to purchase any current products to help you create your own beautiful projects, click the button below for my online store.
I'm so excited to share that I have an exclusive PDF Tutorial of a special project for every order placed, no minimum required! (*Canadian residents only). New projects every month.
I also love to send you a handmade thank you card in the mail.
I appreciate your support of my small business!
YouTube Replay:
Did you know that every week I send my email subscribers a PDF with all the details from my weekly projects? You can sign up for my weekly newsletter here, and you too will get fun tips, inspiration, updates and exclusive freebies.
Remember:
Shop here and all orders will receive a FREE PDF Tutorial of a special unique project that isn't available anywhere else. I'll also send you a personal handmade thank you card in the mail!
Spend $200 or over and receive Stampin' Rewards to get free products! No need for a code at all!
Want to join my crafty community, The Sunshine Crafters and enjoy your crafting supplies at a discount? The Starter Kit really is the best deal! Only $135 for $165 worth of product and free shipping! Click here to learn more!
Thanks friends for stopping by today and have fun crafting!


Comments